Monday, March 31, 2014

Brown scrappy rectangle quilt

Well, now that i am through with customer quilting...it is time to dig into that to-be-quilted cabinet in the studio and finish those babies up.

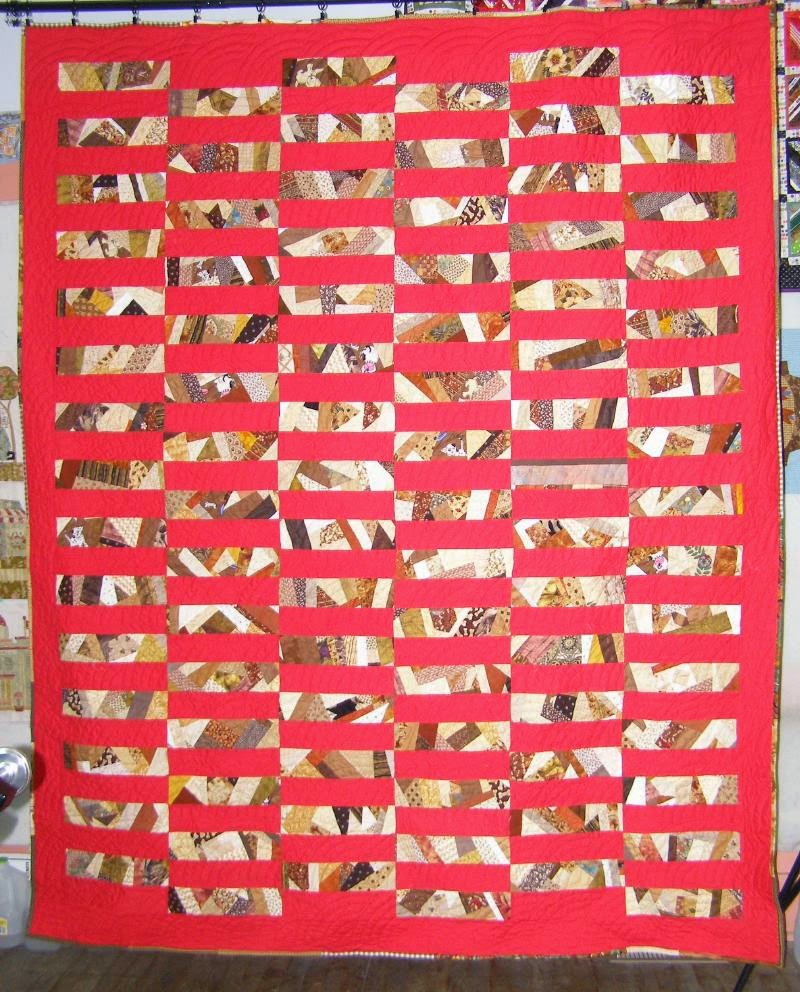
The first one i did was this one.....brown scrappy rectangles alternated with red. i think it came out about 68x88"  i didn't photograph the back...don't know why....just didn't even think about it. it is a yellow floral print. and for the binding i used different brown strips all sewn together to make a long strip.


I just love those little dogs. there are several blocks with them in there. they make me smile. you can see a couple different pieces of the binding here.


The brown blocks have a base onto which i sewed the brown scraps. they are about 3x10"  i find it so much easier to piece these type of blocks when i use a base fabric. that helps to keep the piece the size that you want. and i use up a lot of ugly fabrics for the base....stuff that won't ever find its way into a quilt any other way. hahaha  check out those peanuts....and the popcorn.


And gingerbread boys. you could make an I Spy quilt with this pattern. 


So, 1 quilt down and over 100 to go. wonder how many i'll have quilted by the end of the year. i already have 3 tops that don't fit into the cabinet. or will i just keep piecing tops till i run out of fabric and be no further along at the end of the year than i am now.....except there will 100 DIFFERENT tops in the to-be-quilted cabinet.  

I need a 12 step program.  sigh!!


Green selvage circle quilt

I use the term 'circle' loosely here. been trying to come up with new ways to use those selvages. 

I sewed green selvage strings onto a foundation base.....7" wide and about 27" long. that size...after being tirmmed down to 6.5" wide gave me 6 triangles...cut with my Tri Recs template. and those 6 Tris make one circle. i realize it is not a real circle....but just go with it, ok?


I used feed sacks for the background piece. 1 feed sack gave me 4 background pieces. i believe this came to 83" square. it is rather hefty since the circles have fabric bases and the borders do, too. 


Once i sewed the triangles together, i stitched it onto the feed sack background and then added a trim around it. 


There are various ribbon trims, rick rack, etc.


The border that you see above and below here is 3"...selvages sewn onto a base. that used up a lot of the small pieces that were cut off when i made the triangles.


It took me a few minutes to figure out how to put those 6 pieces together. i thought i could put all the points together in the middle and it would make a circle but that didn't happen. i had to sew 1/2 at a time......the middle piece with the point toward the center and the 2 outer pieces with the point toward the outside. then sew the 2 halves together. 


I really, really thought this would deplete my green selvages. sigh!!  i don't know WHY i always think it will take a mountain of selvages to make a quilt. it seems i have more now than when i started. i couldn't even stuff them all back in the bin that they came out of. so, now i have 2 boxes of green selvages. i contemplated throwing them away.....for about half a minute....couldn't do it. 

Next selvage quilt is a yellow one. hint....baskets....and hummingbirds.  that's all i can say. if i told you i would have to kill you...it's a secret.  hahaha


Saturday, March 29, 2014

I Won!!

Vicki Welsh had give aways every day last week for Spring Break. she had a piece of glass as one day's prize. although i signed up most, if not all, of the days.....i really, really wanted the glass piece.

And....i won it.    isn't fate wonderful?     i love you, Vicki

Check this out.


The white spots are from light shining. couldn't seem to get rid of it.


I love this piece. I know it will go to live at the Duck....but not it's specific location yet. i might have to decorate a whole room around this piece. don't know if i should show it to my sister....she might want it.

Thank you, Vicki.  

Monday, March 24, 2014

Will it never end??

I went to the Duck for a few days......accepted delivery of 7 more windows. as many windows as this house has.....and the dining room is still dark as a cave. it only has 1 window and is on the north side. 

These 5 go in the dressing room/closet for the master bedroom. there are 4 of that smaller size and 1 larger one behind them.


And these 2 go in the kitchen...over the sink. that room is a bit dark, too. windows face south. 


And i STILL need more windows....3 on the enclosed front porch and 6 on the enclosed back porch. there are 31 windows all together in this house. and then 2 more in the office in the garage. i would have swore there were 100.  it would take a week to wash them all.

It was still kind of chilly during the day so i didn't do much. kind of cleaned up things and moved some stuff around. then i got a wild hair and decided to pull off the aluminum siding that is INSIDE the garage. i have hated that from day 1. why would someone do that? it looked stupid.

That job was harder than i thought. ....  haha...aren't they all?  i tried to take it off from the top down....but there are lights attached and pipes and the garage door opener was in the way. so i just ripped a piece off in the middle and went from there.

I got this whole wall done as far up as i could reach without a ladder. there are sheets of plywood behind it. plus...vines were growing between the plywood and the siding. i keep pulling them away from the house on the outside....but they keep coming in. that tells me there is no type of foundation or footing under this garage. or it is rotted.


And started on this side. it was tougher. when the previous owner got to the window....he wrapped a piece of metal around it and caulked it really, really well. this was a car wash in this bay.....he had a car repair business in this garage....so i guess that is why he caulked so well...keep the water from coming in that window and into the office.  i got tired of that real quick. but there is just plywood under all this crap...so eventually i will get it all down and maybe just slap a coat of paint on it. anything will be better than that crappy siding.


After fooling with the siding for a few hours, i decided to pull more ceiling tiles out in the garage....in the office.... i got all that i could reach. i had to leave one side....there are baseboards all against that wall and i couldn't get the ladder over there.


And in the storage room behind the office in the garage.  would you look at that mess of wiring and pipes and crap up there? some of those wires up there are just sort of put together....no tape...no metal box....no nothing. this is going to be a nightmare to figure out. i am sorely tempted to just tear it all out and just start again to hook up lights. 


My other little adventure occurred before i even got to the Duck. i got off the highway to go to my sister's....stopped at a red light......started to go when the light turned green and heard a loud THUNK.  OMG...what was that?  i'm picturing in my mind something falling off the bottom of my truck. hahahaha

But the truck kept moving...no more noises. i'm looking around.....the guy on the right side of me is looking at me all funny....he looks weird and guilty. he turns right at the first opportunity and disappears. it's about 4 more blocks to my sister's so i just go on....expecting something dire to happen to the truck...but i make it ok.

I pull in her driveway and look under my truck...expecting to see....i don't know what.....the spare tire missing?  ..... the muffler hanging down? .... i don't know. nothing seems amiss under there.

Then.....i spot this. busted light and a dent under the light about 2".


Well, hell....that's why that guy was looking all weird at me. he apparently hit me when he went around me. i guess he didn't judge his distance well. i guess he thought i was going to move quicker.  i never felt a bump from it.....i guess because we were both moving in the same direction so all i heard was the thump.  i noticed his left front bumper was crunched in. i don't know if that happened when he hit me....doesn't seem too likely.....or if he hit me WITH the bumper that was hanging out. 

Anyway....all that doesn't work is the turn signal. i figured i would replace that bulb and get a new plastic cover and i'm good to go. well, no...you have to replace the whole damn piece.....$100 at the car parts place.  I don't think so......found a part on eBay....brand new in the box....for $20.  hubby can fix it for me when the part comes....4 little screws to replace it.  one little piece at a time....soon i will have a new truck. hahahaha

I need some warm days so i can go and do some real work at the Duck. come on Spring!


Tuesday, March 18, 2014

Butterflies

These butterflies are winging their way back to California...that's where the customer lives. she made this top for her daughter. it's been on my frame for a couple months. but half that time we were in frozen tundra conditions with ice and snow and i didn't go over to the studio....to conserve on propane usage.

But i finally thawed out and got it finished. it is 88 x 88". she appliqued those butterflies.


Glide thread on top...light gray and chestnut. bottom line in the bobbin


Last border was a partial panto that was flowers and leaves


Curved cross-hatching in setting triangles


All butterflies had different backgrounds...and had veins in their wings. this one above looks like it is sitting on a large flower.


This one has a spiderweb and a sun shining down. in the grass at the bottom is a catterpillar.


Some simply got swirls 


This one sort of looks like a flower, too...although that wasn't the intention.


 I managed to get an oval around this one.


Not sure what this was supposed to be...it was different in my head. hahahaha


This one has the circle designs in the wings and the background. i was almost done at this point but was thinking it would have been cool if all the wings echoed the background fills. 


Beautiful butterfly on this one.


The lines in the fabric made the squares easy to stitch.


Just a meander in this one.


Lots of pebbles here


And some radiating lines.


And a bit of McTavishing.

There were more butterflies but you get the idea. 

The back was the same white with blue dots as the border. and the light gray did not show much on the back. 

First customer quilt of the new year....and last customer quilt to be done. now i'm all about me. LOL


Global Concepts

I am almost done with the Block Rockin' series.  this is #10....Global Concepts. have no idea who they are.


I'm thinking i want to put these 12 blocks together unusually instead of a normal setting. anyone know of any rock and roll fabric? that might be cool.


Friday, March 14, 2014

Black and White and Lime 1600 inch quilt

Even though i cut two 3" strips from all the fabrics in the Cumberland Collection line....i had 36 different pieces....the quilt top still turned out kind of small. it is about 60x80


The darks and lights didn't integrate the way i would have liked them to. 


I had 3 or 4 strips that were shorter than the usual 40" but that didn't seem to help.


But i like the lime green....it sort of wakes it up.


I just added another row of white and black along the edges to make it a bit wider. and, yes, i should have done that before i added the lime....but then i wouldn't have had enough of the lime to go around. i guess i could have put something else in the corners.

But...it is what it is and .... done is good.   still lots of those black and white fabrics. gotta find something else to do with them.

Do you think of the 1600" quilt when you need something in a hurry?  this was literally done in an afternoon.


Thursday, March 13, 2014

Black and White Step Down Squares

Remember Ebony and Ivory? .... it was my friend, Mary's, design and our class all did one.  it looked like this.


The fabric line is The Cumberland Collection by Choice Fabrics. I really loved those fabrics and went and got more of it....quite a bit more. LOL

So, yesterday i finished piecing what i am calling Black and White Step Down Squares. i used the Cumberland Collection to make it. i saw the pattern somewhere online and stole it. LOL  it turned out 82x90" .


It went super fast and i am in love with it.


All you do is cut out 8 1/2" blocks.....4 1/2" blocks.....and 2 1/2" blocks. 


I made 4 patches with the 4 1/2" blocks and 16 patches....made up of four 4 patches.....with the 2 1/2" blocks. that way they were all 8" finished.


Made the border half white and half black. 


I want to make more of these with different colors. the next one will have less 8" blocks and more 4" blocks i'm thinking. 

PLUS....i still have more .....lots more....of The Cumberland Collection left over. more white than black. gotta find something else to make with it. probably enough left for a couple more quilts.  

I cut some of Cumberland up for a 1600" quilt......lots more still left. i see more B&W quilts in my immediate future.


Sunday, March 9, 2014

Two Scrappy Tops

I'm sewing like a mad woman to use up scraps. i don't think it will ever actually happen....but i am working on it. the last quilt i did i needed 4" scrappy blocks and didn't find much of that size in the boxes, so i think progress is happening. 

I plan on going through all the scrap boxes and cut everything down into 3", 2 1/2" and 2" strips. that should help. it won't be so messy. 

This top has been sitting in the studio for a while....partly finished. finally buckled down and got it all together. i call it Selvage Framed Squares. those are selvages around the middle squares. it is 88" x 100"


Then i finished piecing this top .... The Plus Side. i saw it in a magazine a few days ago. it got pieced together quickly.  i wonder why some get done quickly and others sit for years waiting for me to finish them. this one is 82" x 94"


I've had the black/gray/white fabric for a while and am glad i found a use for it. the print that is around the plus signs is all gone. i still have a bit of the border fabric though. 


Just these 2 tops got 10.5 yards of fabric out of the stash. baby steps

Now i am cutting out black and white prints for the next top. i saw a photo somewhere online and decided i HAD to make it. hahahah   

Stay tuned


Search This Blog